しばらく中断していた Mikan 本関連です。5日目くらいまで本に沿ってやっていたのですがどうも馴染めないのでやり方を変えることにした。
本をみちしるべにしつつも環境構築から勝手に行い、好きに書いていくほうがわかりやすいのでは?と思いやってみることにした。
まずは edk2 Hello world から
事前準備
edk2 をインストールして予め BaseTools をビルドしておくこと。
BaseTools に build スクリプトが含まれるのでこれをしとかないとビルドができない。
ツリー構造
今回つくる HelloPkg は最終的にこういう感じで配置しています。edk2 フォルダは git clone した時にできたフォルダになります。
- プロジェクトルート
- edk2 フォルダ
- Build
- HelloPkg << 今回作るパッケージ
- Include
- Library
- Main.c
- Hello.inf
- HelloPkg.dec
- HelloPkg.dsc
コード
Claude に聞くと上記の各アイテムを作れと言わるので作っていきます。
$ cd edk2
$ mkdir Include Library
$ touch Main.c Hello.inf HelloPkg.dec Hello.Pkg.dsc
各ファイルはこんな感じになります。
最初は、C ソースです。
#include <Uefi.h>
#include <Library/UefiLib.h>
#include <Library/UefiApplicationEntryPoint.h>

EFI_STATUS
EFIAPI
UefiMain(
    IN EFI_HANDLE       ImageHandle,
    IN EFI_SYSTEM_TABLE *SystemTable
)
{
    Print(L"Hello edk2\n");
    return EFI_SUCCESS;
}
UefiMain はなんにもしていないので極めてシンプルです。
次は、 HelloPkg.dec です。
このファイルの役割はよくわかっていませんが今の所、あまり書くことはありません。
[Defines]
DEC_SPECIFICATION = 0x00010005
PACKAGE_NAME      = HelloPkg
PACKAGE_GUID      = 25d16f8a-7fb0-467d-a13d-97c83f2a84a4
PACKAGE_VERSION   = 0.1


[Includes]
Include

[Guids]

[Protocols]

[PcdsFixedAtBuild]
DEC_SPECIFICATION は edk2 の公式ドキュメントで定義されている DEC のバージョンです。
PACKAGE_GUID は uuidgen などで生成した値を指定します。
edk2 ではちょくちょく GUID を指定する場面がありますが、その都度 uuidgen などで生成してコピペしてやります。
HelloPkg.dsc です。
[Defines]
PLATFORM_NAME               = HelloPkg
PLATFORM_GUID               = 46fcca5f-7fe2-4cd7-83e4-f0b535d60410
PLATFORM_VERSION            = 0.1
DSC_SPECIFICATION           = 0x00010005
OUTPUT_DIRECTORY            = Build/HelloPkg
SUPPORTED_ARCHITECTURES     = X64
BUILD_TARGETS               = DEBUG|RELEASE|NOOPT
SKUID_IDENTIFIER            = DEFAULT

[LibraryClasses]
UefiApplicationEntryPoint|MdePkg/Library/UefiApplicationEntryPoint/UefiApplicationEntryPoint.inf
UefiLib|MdePkg/Library/UefiLib/UefiLib.inf

# dependencies
BaseLib|MdePkg/Library/BaseLib/BaseLib.inf
BaseMemoryLib|MdePkg/Library/BaseMemoryLib/BaseMemoryLib.inf
DebugLib|MdePkg/Library/BaseDebugLibNull/BaseDebugLibNull.inf
DevicePathLib|MdePkg/Library/UefiDevicePathLib/UefiDevicePathLib.inf
MemoryAllocationLib|MdePkg/Library/UefiMemoryAllocationLib/UefiMemoryAllocationLib.inf
PcdLib|MdePkg/Library/BasePcdLibNull/BasePcdLibNull.inf
PrintLib|MdePkg/Library/BasePrintLib/BasePrintLib.inf
RegisterFilterLib|MdePkg/Library/RegisterFilterLibNull/RegisterFilterLibNull.inf
UefiBootServicesTableLib|MdePkg/Library/UefiBootServicesTableLib/UefiBootServicesTableLib.inf
UefiRuntimeServicesTableLib|MdePkg/Library/UefiRuntimeServicesTableLib/UefiRuntimeServicesTableLib.inf

[Components]
HelloPkg/Hello.inf
先程と異なり結構書きます。
どうやらこのファイルに記述したモジュール名を頼りにビルドの依存関係を解決していくようです。
その仕組みと source edksetup.sh を使って、Main.c で突然出てきた Uefi.h とかを参照し、リンクするってことをしているようです。
当初 [LibraryClasses] には UefiApplicationEntryPoint と UefiLibMdePkg の2行しか記述していなかったのですが、それだと edk2 の build コマンドでビルドエラーが出てきます。
例えば、 BaseLibMdePkg が見つからないよとか言ってきます。直してはビルドを繰り返していくうちにこういうふうになりました。結局 Mikan 本の[LibraryClasses] とほぼ同じ感じになったはず。
Hello.inf です
[Defines]
INF_VERSION     = 0x00010005
BASE_NAME       = HelloApp
FILE_GUID       = 2bbb1fb0-95b5-4b59-a98c-15093d771b11
MODULE_TYPE     = UEFI_APPLICATION
VERSION_STRING  = 0.1
ENTRY_POINT     = UefiMain

[Sources]
Main.c

[Packages]
MdePkg/MdePkg.dec
HelloPkg/HelloPkg.dec

[LibraryClasses]
UefiLib
UefiApplicationEntryPoint
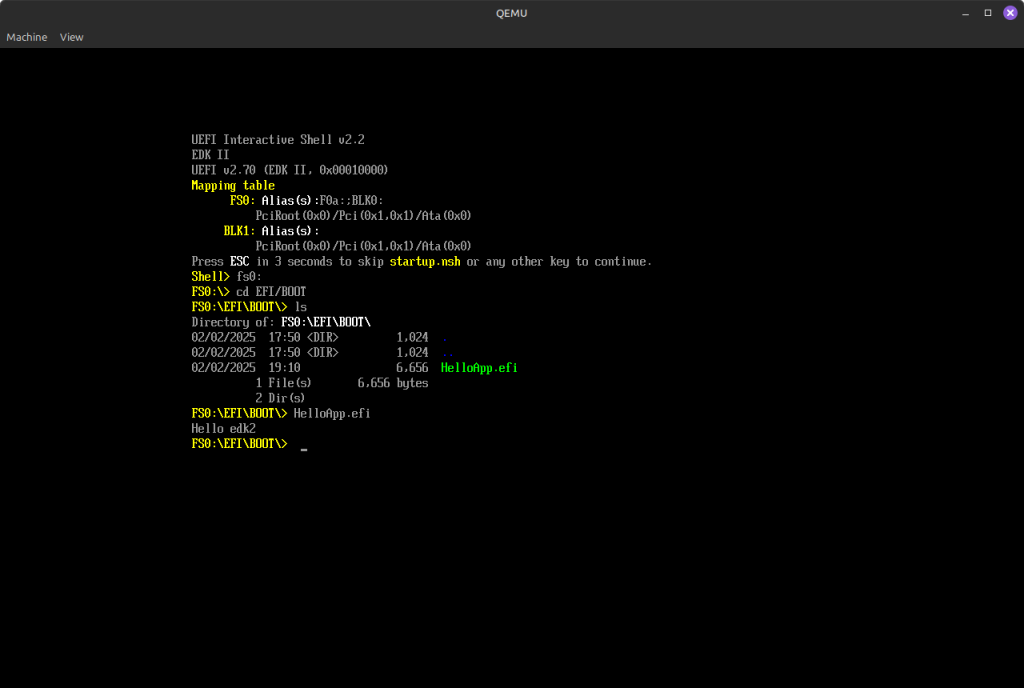
ビルドすると BASE_NAME が引き継がれて HelloApp.efi が作成されるようです。
ビルド結果は edk2/Build/HelloPkg/DEBUG_CLANGDWARF/X64 に保存されます。
保存先のフォルダは build コマンドに引数を渡さなければ以下のようになります。
DEBUG_CLANGDWARF は、edk2/Conf のtarget.txt の TARGET= と TOOL_CHAIN_TAG= を組み合わせたものになります。GCC を使っていれば DEBUG_GCC とかになります。
X64 の部分も同じように target.txt の TARGET_ARCHI= の値が来ます。
build -t CLANGDWARF とかすると target.txt の内容を無視して指定の内容で実行されます。
長くなったので QEMU での実行は次の記事にします。