WPP
Pixel 6a を LinegeOS 22 にアップグレード

年末くらいから Pixel 6a に入れている LinegeOS 21 (Android14) にアップグレードが来なくなりました。正確には毎週のアップデート通知はくるが、メジャーアップデートなのでそのままではアップデートできません。

ちょっと時間が取れたので 22 にアップグレードしていきます。本来ならデータバックアップを取るべきですが、公式の手順にも wipe しないよって書いてあるのでそのまま行きます。基本、重要データは退避してあるはずなのでまあ OK でしょうという感じで進めます。(真似してコケて泣いてももしりません。)

流れはこんな感じ。

  1. OS の zip、 Google apps をダウンロード
  2. リブートして sideload に入る
  3. PC から sideload で OS を焼く
  4. Pixel を再起動してリカバリーに入る
  5. リカバリーの中で Advanced Option から sideload を起動する
  6. PC から sideload で Google apps を焼く
  7. Pixel 6a を再起動して LineageOS 22 を起動する

OS ダウンロード

LineageOS Downloads から lineage-22.1-20250118-nightly-bluejay-signed.zip をダウンロードしておく。

Google apps ダウンロード

Google apps | LineageOS Wiki から LineageOS 22.1 (Android15) ARM64 用のGApps をダウンロードしておく

リブートして sideload に入る、OS を焼く

予め USB ケーブルで PC と Pixel 6a をつなげ USB デバッグを有効にしておく。(もちろん ADB もインストールしておくこと)

そしたら以下を PC で実行する。(.zip と同じフォルダにいるとする)

$ adb -d reboot sideload
; 実行すると Pixal 6a が再起動する

; sideload に入ったら
$ adb -d sideload  lineage-22.1-20250118-nightly-bluejay-signed.zip 

; 終わるまえ1分くらい待つ

Pixel を再起動してリカバリーに入る

終わったら、次はリカバリーに入り直す。

Pixel の画面で Advanced を選び、 Reboot to Recovery 的なやつで Pixel を再起動します。

リカバリーの中で sideload を起動する

Pixel の LineageOS リカバリーが起動したら、Apply Update をタップする。そうすると sideload 待ちの状態になる。

PC から sideload で Google Apps を焼く

また、PC に戻り今度は Google Apps を焼く

$ adb -d sideload MindTheGapps-15.0.0-arm64-20240928_150548.zip
; 終わるまで少し待つ

Pixel 6a を再起動して LineageOS 22 を起動する

Pixel 6a の LineageOS リカバリーで Reboot system 的なやつで再起動する。
上手く行っていれば、LinegeOS 22 が起動してきます。

失敗した場合は、焼き直しやワイプ、ダウンロードファイルの大きさなんかをチェックしてやり直すといいと思います。

あっけなくアップグレードできてよかった。

LinegeOS の公式の手順は、実行するコマンドが文章中に埋め込まれているので拾いだすのが面倒なのでメモした。まあ、たいした手順じゃないから、文に埋めたい気持ちもわかる気がする。

参考

Upgrade LineageOS on bluejay | LineageOS Wiki

Android color int の色の並び

超小ネタです。

アンドロイドの UI で Color( 0xd0203040 ) となっていた場合の色の並び

ARGB の順に並んでいる A は透明度で基本 FF でもかまわないと思う。

Android でサービスと通信する-Channel編

サービスと通信するサンプル 3 部作の追加編です。で Flow (Channel) を使用してみます。

3 部作はこちら

  • ブロードキャストを送信する
  • LiveDataを使う
  • Messanger を使う
  • そもそも、なぜ上の3手法を試したのかというと、Claude か Gemini か ChatGTP に「サービスの状態をアクティビティに通知するにはどういう方法がある?」って聞いた結果、3 つの方法が回答にあったのがキッカケだった。

    でサンプルを探して作っていくうちに、Flow をイベントバスに使う方法もあるらしいということを探し当てたのでやってみる。

    MainActivity はこんな感じになりました。

    package red.txn.service_flow
    
    import android.content.ComponentName
    import android.content.Context
    import android.content.Intent
    import android.content.ServiceConnection
    import android.os.Bundle
    import android.os.IBinder
    import android.util.Log
    import androidx.activity.ComponentActivity
    import androidx.activity.compose.setContent
    import androidx.activity.enableEdgeToEdge
    import androidx.compose.foundation.layout.fillMaxSize
    import androidx.compose.foundation.layout.padding
    import androidx.compose.material3.Scaffold
    import androidx.compose.material3.Text
    import androidx.compose.runtime.Composable
    import androidx.compose.ui.Modifier
    import androidx.compose.ui.tooling.preview.Preview
    import kotlinx.coroutines.CoroutineScope
    import kotlinx.coroutines.Dispatchers
    import kotlinx.coroutines.launch
    import red.txn.service_flow.ui.theme.ServiceflowTheme
    
    class MainActivity : ComponentActivity() {
        companion object {
            const val TAG = "MainActivity"
        }
    
        override fun onCreate(savedInstanceState: Bundle?) {
            super.onCreate(savedInstanceState)
            enableEdgeToEdge()
            setContent {
                ServiceflowTheme {
                    Scaffold(modifier = Modifier.fillMaxSize()) { innerPadding ->
                        Greeting(
                            name = "Android",
                            modifier = Modifier.padding(innerPadding)
                        )
                    }
                }
            }
    
            // launch service
            Intent(this, FlowService::class.java).also { intent ->
                startService(intent)
            }
            Log.d(TAG,"service launched")
    
            val scope = CoroutineScope(Dispatchers.IO)
            scope.launch {
                FlowService.BUS.collect {
                    Log.d(TAG, "Received data: $it")
                }
            }
        }
    }
    
    @Composable
    fun Greeting(name: String, modifier: Modifier = Modifier) {
        Text(
            text = "Hello $name!",
            modifier = modifier
        )
    }
    
    @Preview(showBackground = true)
    @Composable
    fun GreetingPreview() {
        ServiceflowTheme {
            Greeting("Android")
        }
    }

    LiveData の observe が Flow の cllect に変わった感じで極端な変化はないですね。わかりやすい。

    サービスのインスタンスなしでアクセスできているのは BUS がサービスの中で companion ojbect として定義されているからです。(理解あってる?)

    package red.txn.service_flow
    
    import android.app.Service
    import android.content.Intent
    import android.os.Binder
    import android.os.IBinder
    import android.util.Log
    import kotlinx.coroutines.CoroutineScope
    import kotlinx.coroutines.Dispatchers
    import kotlinx.coroutines.channels.Channel
    import kotlinx.coroutines.flow.MutableStateFlow
    import kotlinx.coroutines.flow.asSharedFlow
    import kotlinx.coroutines.flow.receiveAsFlow
    import kotlinx.coroutines.launch
    
    class FlowService : Service() {
        companion object {
            val TAG = "FlowService"
            private var _BUS = Channel<String>()
            val BUS = _BUS.receiveAsFlow()
        }
    
        override fun onStartCommand(intent: Intent?, flags: Int, startId: Int): Int {
            Log.d(TAG, "onBind")
            Thread {
                for (i in 1..2) {
                    Thread.sleep(2000)
                    updateData("データ$i")
                    Log.d(TAG, "データ$i")
                }
            }.start()
    
            return START_STICKY
        }
    
        override fun onBind(intent: Intent): IBinder? {
            return null
        }
    
        fun updateData(data: String) {
            val scope = CoroutineScope(Dispatchers.IO)
            scope.launch {
                _BUS.send(data)
            }
        }
    }

    BUS と _BUS は companion object から普通のメンバに変えてもいいかも。

    AIチャットボットの回答で漏れていた方法をたまたま見つけたわけですが、現時点では AI の回答が網羅性があり、正しい(妥当か)を判断するには読み取る人間側がそもそもその答え知らないといけない例として覚えておきたい。

    AIチャットボットに限らず検索の回答から漏れているものが認識されない、つまり存在しないことにされてしまうのはとても考えさせられると感じてしまう。

    参考

    LiveDataをFlowにリプレースしてみて得た知見(StateFlow、SharedFlow、Channel) #Android – Qiita

    Android でサービスと通信する-Messenger編
  • ブロードキャストを送信する
  • LiveDataを使う
  • Messanger を使う
  • 3 部作の最後です、Messanger を使ってみます。

    アクティビティとハンドラーの定義です。

    package red.txn.service_messenger
    
    import android.content.ComponentName
    import android.content.Context
    import android.content.Intent
    import android.content.ServiceConnection
    import android.os.Bundle
    import android.os.Handler
    import android.os.IBinder
    import android.os.Looper
    import android.os.Message
    import android.os.Messenger
    import android.util.Log
    import androidx.activity.ComponentActivity
    import androidx.activity.compose.setContent
    import androidx.activity.enableEdgeToEdge
    import androidx.compose.foundation.layout.fillMaxSize
    import androidx.compose.foundation.layout.padding
    import androidx.compose.material3.Scaffold
    import androidx.compose.material3.Text
    import androidx.compose.runtime.Composable
    import androidx.compose.ui.Modifier
    import androidx.compose.ui.tooling.preview.Preview
    import red.txn.service_messenger.MainActivity.Companion.TAG
    import red.txn.service_messenger.ui.theme.ServicemessengerTheme


    class MainActivity : ComponentActivity() {
        companion object {
            const val TAG = "MainActivity"
        }
    
        override fun onCreate(savedInstanceState: Bundle?) {
            super.onCreate(savedInstanceState)
            enableEdgeToEdge()
            setContent {
                ServicemessengerTheme {
                    Scaffold(modifier = Modifier.fillMaxSize()) { innerPadding ->
                        Greeting(
                            name = "Android",
                            modifier = Modifier.padding(innerPadding)
                        )
                    }
                }
            }
    
            // launch service
            Intent(this, MessengerService::class.java).also { intent ->
                bindService(intent, serviceConnection, Context.BIND_AUTO_CREATE)
            }
        }
    
        private lateinit var messenger: Messenger
        private val serviceConnection = object : ServiceConnection {
            override fun onServiceConnected(name: ComponentName?, service: IBinder?) {
                messenger = Messenger(service)
            }
    
            override fun onServiceDisconnected(name: ComponentName?) {
                Log.d(TAG, "onServiceDisconnected()")
            }
        }
    }
    
    class MessageHandler: Handler(Looper.getMainLooper()) {
        override fun handleMessage(msg: Message) {
            when(msg.what) {
                MESSAGE_FROM_SERVICE-> {
                    // handle the response message
                    Log.d(TAG, "received: ${msg.data.toString()}")
                }
                else -> {
                    Log.d(TAG, "received other: $msg")
                }
            }
        }
    }
    
    //***
    //*** compsable functions
    //***
    @Composable
    fun Greeting(name: String, modifier: Modifier = Modifier) {
        Text(
            text = "Hello $name!",
            modifier = modifier
        )
    }
    
    @Preview(showBackground = true)
    @Composable
    fun GreetingPreview() {
        ServicemessengerTheme {
            Greeting("Android")
        }
    }

    class Handler はサービスでも参照します。

    
    package red.txn.service_messenger
    
    import android.app.Service
    import android.content.Intent
    import android.os.Binder
    import android.os.Handler
    import android.os.IBinder
    import android.os.Looper
    import android.os.Message
    import android.os.Messenger
    import android.util.Log
    import kotlinx.coroutines.CoroutineScope
    import kotlinx.coroutines.Dispatchers
    import kotlinx.coroutines.cancel
    import kotlinx.coroutines.launch
    
    
    const val MESSAGE_FROM_SERVICE: Int = 2
    
    class MessengerService : Service() {
        companion object {
            const val TAG = "MessengerService"
        }
    
        private val messenger = Messenger(MessageHandler())
    
    
        override fun onBind(intent: Intent): IBinder {
            Log.d(TAG, "onBind()")
            Thread {
                for (i in 1..2) {
                    Thread.sleep(2000)
                    sendMessageFromService()
                    Log.d(TAG, "sendBroadcast: $i")
                }
            }.start()
            return MyBinder()
        }
    
        inner class MyBinder: Binder() {
            fun getService(): MessengerService = this@MessengerService
        }
    
        private fun sendMessageFromService() {
            val message = Message.obtain()
            message.what = MESSAGE_FROM_SERVICE
            message.data.putString("message", "Hello from MessengerService")
            //message.replyTo = messenger
            messenger.send(message)
        }
    
        override fun onDestroy() {
            super.onDestroy()
            Log.d(TAG, "onDestroy(")
        }
    }

    普通はメッセージの場合、普通は双方向通信に使うことが多いようですが、message.replyTo が空でも問題ないようです。

    ちょっと試していないのでなんともいえませんがこのサービスももしかすると、startService() 起動に書き換えることができるかもしれません。その場合は Messenger を Activity に渡す必要があるので、LiveData の時と同じようにMessenger を companion object にする必要がありそうです。

    Android でサービスと通信する-LiveData編

    その 2 今度は LiveData を使ってみます。

  • ブロードキャストを送信する
  • LiveDataを使う
  • Messanger を使う
  • LiveData を使うならこんな感じ

    package red.txn.service_livedata
    
    import android.content.ComponentName
    import android.content.Context
    import android.content.Intent
    import android.content.ServiceConnection
    import android.os.Bundle
    import android.os.IBinder
    import android.util.Log
    import androidx.activity.ComponentActivity
    import androidx.activity.compose.setContent
    import androidx.activity.enableEdgeToEdge
    import androidx.compose.foundation.layout.fillMaxSize
    import androidx.compose.foundation.layout.padding
    import androidx.compose.material3.Scaffold
    import androidx.compose.material3.Text
    import androidx.compose.runtime.Composable
    import androidx.compose.ui.Modifier
    import androidx.compose.ui.tooling.preview.Preview
    import red.txn.service_livedata.ui.theme.ServicelivedataTheme
    
    class MainActivity : ComponentActivity() {
        override fun onCreate(savedInstanceState: Bundle?) {
            super.onCreate(savedInstanceState)
            enableEdgeToEdge()
            setContent {
                ServicelivedataTheme {
                    Scaffold(modifier = Modifier.fillMaxSize()) { innerPadding ->
                        Greeting(
                            name = "Android",
                            modifier = Modifier.padding(innerPadding)
                        )
                    }
                }
            }
    
            // launch service
            Intent(this, LiveDataService::class.java).also { intent ->
                bindService(intent, connection, Context.BIND_AUTO_CREATE)
            }
        }
    
        private var bound = false
        private lateinit var liveDataService: LiveDataService
    
        private val connection = object : ServiceConnection {
            override fun onServiceConnected(name: ComponentName?, service: IBinder) {
                val binder = service as LiveDataService.MyBinder
                liveDataService = binder.getService()
                bound = true
                observeData()
            }
            override fun onServiceDisconnected(name: ComponentName?) {
                bound = false
            }
        }
    
        fun observeData() {
            liveDataService.BUS.observe(this) { newData ->
                Log.d("AAA", "Activity:" + newData.toString())
            }
        }
    }
    
    
    //***
    //*** Composable functions
    //***
    @Composable
    fun Greeting(name: String, modifier: Modifier = Modifier) {
        Text(
            text = "Hello $name!",
            modifier = modifier
        )
    }
    
    @Preview(showBackground = true)
    @Composable
    fun GreetingPreview() {
        ServicelivedataTheme {
            Greeting("Android")
        }
    }

    bindService() でサービス起動をしているので少し様子が異なるが、バインドしたとき observeData() で監視している。とっても簡単

    package red.txn.service_livedata
    
    import android.app.Service
    import android.content.Intent
    import android.os.Binder
    import android.os.IBinder
    import android.util.Log
    import androidx.lifecycle.MutableLiveData
    import kotlinx.coroutines.CoroutineScope
    import kotlinx.coroutines.Dispatchers
    import kotlinx.coroutines.launch
    
    class LiveDataService : Service() {
        companion object {
            const val TAG = "LiveDataService"
        }
    
        val BUS = MutableLiveData<String>()
    
        override fun onBind(intent: Intent): IBinder {
            Log.d(TAG, "serviee onBind()")
            Thread {
                for (i in 1..2) {
                    Thread.sleep(2000)
                    updateData("データ$i")
                    Log.d(TAG, "データ$i")
                }
            }.start()
    
            val scope = CoroutineScope(Dispatchers.IO)
            scope.launch {
                for (i in 1..2) {
                    Thread.sleep(2000)
                    updateData("データ2$i")
                    Log.d(TAG, "データ2$i")
                }
            }
            return MyBinder()
        }
        inner class MyBinder: Binder() {
            fun getService(): LiveDataService = this@LiveDataService
        }
    
        private fun updateData(newData: String) {
            BUS.postValue(newData)
        }
    }

    AndroidManifest.xml は生成されたものなので省略。

    startService() でサービス起動したい場合は、こんなふうになった。

    package red.txn.service_livedata
    
    import android.content.ComponentName
    import android.content.Context
    import android.content.Intent
    import android.content.ServiceConnection
    import android.os.Bundle
    import android.os.IBinder
    import android.util.Log
    import androidx.activity.ComponentActivity
    import androidx.activity.compose.setContent
    import androidx.activity.enableEdgeToEdge
    import androidx.compose.foundation.layout.fillMaxSize
    import androidx.compose.foundation.layout.padding
    import androidx.compose.material3.Scaffold
    import androidx.compose.material3.Text
    import androidx.compose.runtime.Composable
    import androidx.compose.ui.Modifier
    import androidx.compose.ui.tooling.preview.Preview
    import red.txn.service_livedata.ui.theme.ServicelivedataTheme
    
    class MainActivity : ComponentActivity() {
        override fun onCreate(savedInstanceState: Bundle?) {
            super.onCreate(savedInstanceState)
            enableEdgeToEdge()
            setContent {
                ServicelivedataTheme {
                    Scaffold(modifier = Modifier.fillMaxSize()) { innerPadding ->
                        Greeting(
                            name = "Android",
                            modifier = Modifier.padding(innerPadding)
                        )
                    }
                }
            }
    
            // launch service
            Intent(this, LiveDataService::class.java).also { intent ->
                startService(intent)
            }
            LiveDataService.BUS.observe(this) {
                Log.d("BUS change:", "Activity:" + it.toString())
            }
        }
    }
    
    
    //***
    //*** Composable functions
    //***
    @Composable
    fun Greeting(name: String, modifier: Modifier = Modifier) {
        Text(
            text = "Hello $name!",
            modifier = modifier
        )
    }
    
    @Preview(showBackground = true)
    @Composable
    fun GreetingPreview() {
        ServicelivedataTheme {
            Greeting("Android")
        }
    }

    サービスの方では LiveData を companion object に入れてインスタンスなしでも取得できるようにしている。

    package red.txn.service_livedata
    
    import android.app.Service
    import android.content.Intent
    import android.os.Binder
    import android.os.IBinder
    import android.util.Log
    import androidx.lifecycle.MutableLiveData
    import kotlinx.coroutines.CoroutineScope
    import kotlinx.coroutines.Dispatchers
    import kotlinx.coroutines.launch
    
    class LiveDataService : Service() {
        companion object {
            const val TAG = "LiveDataService"
            val BUS = MutableLiveData<String>()
        }
    
        override fun onBind(intent: Intent): IBinder? {
            return null
        }
    
        override fun onStartCommand(intent: Intent?, flags: Int, startId: Int): Int {
            super.onStartCommand(intent, flags, startId)
    
            Thread {
                for (i in 1..2) {
                    Thread.sleep(2000)
                    BUS.postValue("newData: $i")
                }
            }
    
            return START_STICKY
        }
    }

    Gemini を使ってみているが、前の文脈からの続きの質問したら流れをぶった切って新しい話題のように回答するのやめてほしい。Claude のほうがその辺楽かも。

    Android でサービスと通信する-ブロードキャスト編

    今回は3部作になり、その1です。

    何をしたいかというとサービスで何か変更した状態をActivityに知らせる方法を試してみます。

    Gemini に聞いてみると 3 つの方法があるようです。

  • ブロードキャストを送信する
  • LiveDataを使う
  • Messanger を使う
  • まずは、SendBroadCast を使ってみます。

    インテントをブロードキャストするパターンの場合、他のアプリでも受信できるようです。

    アクティビティはこんな感じになります。

    package red.txn.service_broadcast
    
    import android.content.BroadcastReceiver
    import android.content.Context
    import android.content.Intent
    import android.content.IntentFilter
    import android.os.Bundle
    import android.util.Log
    import androidx.activity.ComponentActivity
    import androidx.activity.compose.setContent
    import androidx.activity.enableEdgeToEdge
    import androidx.compose.foundation.layout.fillMaxSize
    import androidx.compose.foundation.layout.padding
    import androidx.compose.material3.Scaffold
    import androidx.compose.material3.Text
    import androidx.compose.runtime.Composable
    import androidx.compose.ui.Modifier
    import androidx.compose.ui.platform.LocalContext
    import androidx.compose.ui.tooling.preview.Preview
    import red.txn.service_broadcast.ui.theme.ServicebroadcastTheme
    
    
    class MainActivity : ComponentActivity() {
    
        private lateinit var receiver: MyReceiver
    
        override fun onCreate(savedInstanceState: Bundle?) {
            super.onCreate(savedInstanceState)
            enableEdgeToEdge()
            setContent {
                ServicebroadcastTheme {
                    Scaffold(modifier = Modifier.fillMaxSize()) { innerPadding ->
                        Greeting(
                            name = "Android",
                            modifier = Modifier.padding(innerPadding)
                        )
                    }
                }
            }
    
            val filter = IntentFilter("serviceComm")
            receiver = MyReceiver()
            registerReceiver(receiver, filter, RECEIVER_NOT_EXPORTED)
    
            val serviceIntent = Intent(this, MyService::class.java)
            startService(serviceIntent)
        }
    
        override fun onDestroy() {
            super.onDestroy()
            unregisterReceiver(receiver)
        }
    }
    
    class MyReceiver: BroadcastReceiver() {
        companion object {
            val TAG = "MyReceiver"
        }
    
        override fun onReceive(context: Context?, intent: Intent) {
            val action = intent.action
            val extras = intent.extras
            Log.d(TAG, "onReceive - action: $action")
    
            extras?.let {
                for (key in it.keySet()) {
                    val value = it.getString(key)
                    Log.d(TAG, "onReceive - extras: $value")
                }
            }
        }
    }
    
    @Composable
    fun Greeting(name: String, modifier: Modifier = Modifier) {
        val context = LocalContext.current
        Text(
            text = "Hello $name!",
            modifier = modifier
        )
    }
    
    @Preview(showBackground = true)
    @Composable
    fun GreetingPreview() {
        ServicebroadcastTheme {
            Greeting("Android")
        }
    }

    クラス MyReceiver は分けたほうがいいですけど、面倒なのでここに入れてます。 IntentFilter に直接文字列で “serviceComm” を入れていますが、これはちゃんと const にしたほうがいいと思います。この値はサービス側でも同じものを使い送信元を識別します。

    サービスは、Android Studio のFile > New > Service > Service メニューから追加すると簡単でいいです。
    AndroidManifest.xml に必要なエントリを追加してくれます。

    package red.txn.service_broadcast
    
    import android.app.Service
    import android.content.Intent
    import android.content.res.Configuration
    import android.os.IBinder
    import android.util.Log
    
    class MyService : Service() {
        companion object {
            val TAG = "MyService"
        }
    
        override fun onBind(intent: Intent): IBinder? {
            return null
        }
    
        override fun onStartCommand(intent: Intent?, flags: Int, startId: Int): Int {
            Thread {
                for (i in 1..2) {
                    Thread.sleep(3000)
                    val intent = Intent("serviceComm").putExtra("data", "メッセージ$i")
                    sendBroadcast(intent)
                    Log.d(TAG, "sendBroadcast: $i")
                }
            }.start()
    
            return START_STICKY
        }
    
        override fun onDestroy() {
            super.onDestroy()
            Log.d(TAG, "onDestroy")
        }
    }

    startService() でサービスを起動しているので onStartCommand() で受けます。一応サービスっぽく時間がかかる処理をするためにダミーで Thread {} で時間稼いでます。

    実行すると class MyReceiver: BroadcastReceiver() で受信して、Log.d(TAG, “onReceive – extras: $value”) で内容を表示します。

    最後に AndroidManifest.xml を提示しますが、Android Studio が自動生成したものでいじっていません。

    <?xml version="1.0" encoding="utf-8"?>
    <manifest xmlns:android="http://schemas.android.com/apk/res/android"
        xmlns:tools="http://schemas.android.com/tools">
    
        <application
            android:allowBackup="true"
            android:dataExtractionRules="@xml/data_extraction_rules"
            android:fullBackupContent="@xml/backup_rules"
            android:icon="@mipmap/ic_launcher"
            android:label="@string/app_name"
            android:roundIcon="@mipmap/ic_launcher_round"
            android:supportsRtl="true"
            android:theme="@style/Theme.Servicebroadcast"
            tools:targetApi="31">
            <service
                android:name=".MyService"
                android:enabled="true"
                android:exported="true"></service>
    
            <activity
                android:name=".MainActivity"
                android:exported="true"
                android:label="@string/app_name"
                android:theme="@style/Theme.Servicebroadcast">
                <intent-filter>
                    <action android:name="android.intent.action.MAIN" />
    
                    <category android:name="android.intent.category.LAUNCHER" />
                </intent-filter>
            </activity>
        </application>
    </manifest>
    ip a コマンドでIPv4アドレスを取り出すスクリプト

    超小ネタです。

    ip a するとたくさんのアダプタとそれぞれのアドレスが一覧で表示されますが、このままだとスクリプトで再利用する際にはちょっと都合が悪いときのワンライナーです。

    例えば wlan0 の IPv4アドレスを取り出したいときはこんなふうに書けます。

    $ ip a dev wlan0 |grep inet | awk '{print $2}' | awk -F '/' '{print $1}'

    分解すると ip a show dev wlan0| gerp inet ではこんな感じの値が取得できます。

    inet 192.168.1.111/24 brd 192.168.1.255 scope global wlan0

    1つ目の awk は2番めのトークンを切り出すので

    192.168.1.111/24

    を出力します。

    2つ目の awk では / を区切り文字として 1 番めを取り出すので

    192.168.1.111

    が手に入ります。これをスクリプト変数なりにいれるとスクリプトで使いまわすことができます。

    makefile で使うには $1 は $$1 にする必要がある。

    もともと Android デバイスを WiFiデバッグ接続しようとして調べたのだが、そもそも Android デバイスの IP アドレスをネットワーク経由で知る方法がないので無駄だったかもしれない。(IP アドレスを知るために USB デバッグで接続する必要があるのでもうつながっている。)

    とはいえ、ip コマンドからアドレスだけを取り出したいシーンは結構あるので覚えておこう

    Android が avahi 対応してくれるといいのだけれど…。多分されないでしょうね。

    Android Studio でプロジェクト名を変更したら gralde プロジェクトが 2つになった

    今日も Android Studio と格闘してます。

    ちょっとプロジェクト名の typo が気になり安易に refactor したらちょっとハマりました。以前もハマったのですが全く対処方法を覚えていなかったのでメモ

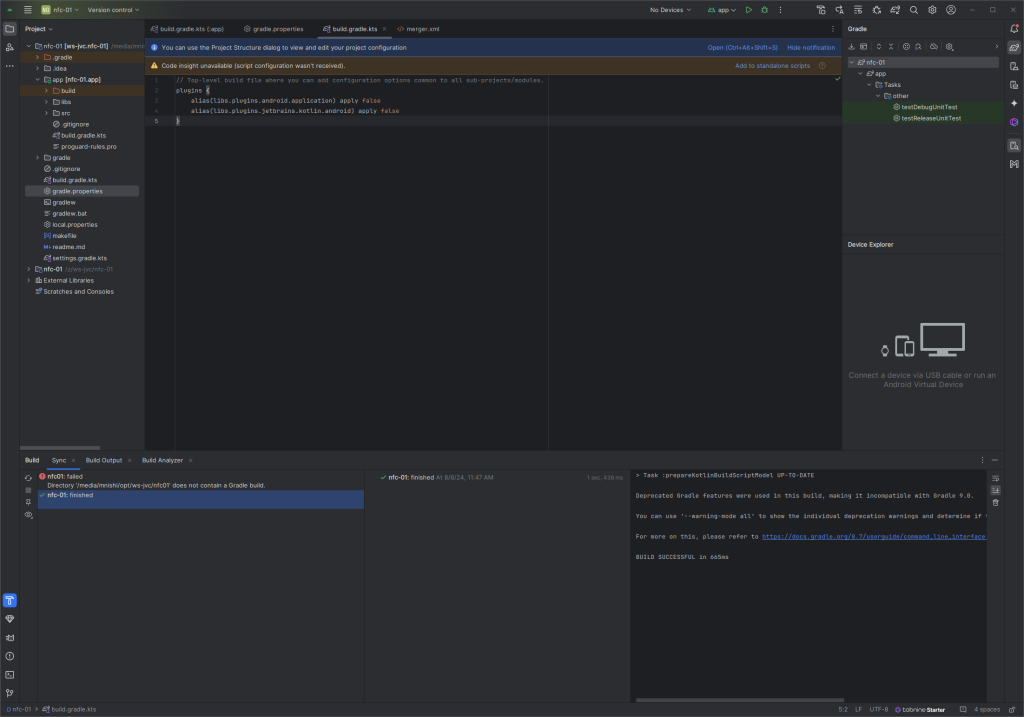
    ツリービューから Refactor でリネームしたのがそもそもの原因ですが、Refactor 後から gradle のシンクにエラーが出ます。

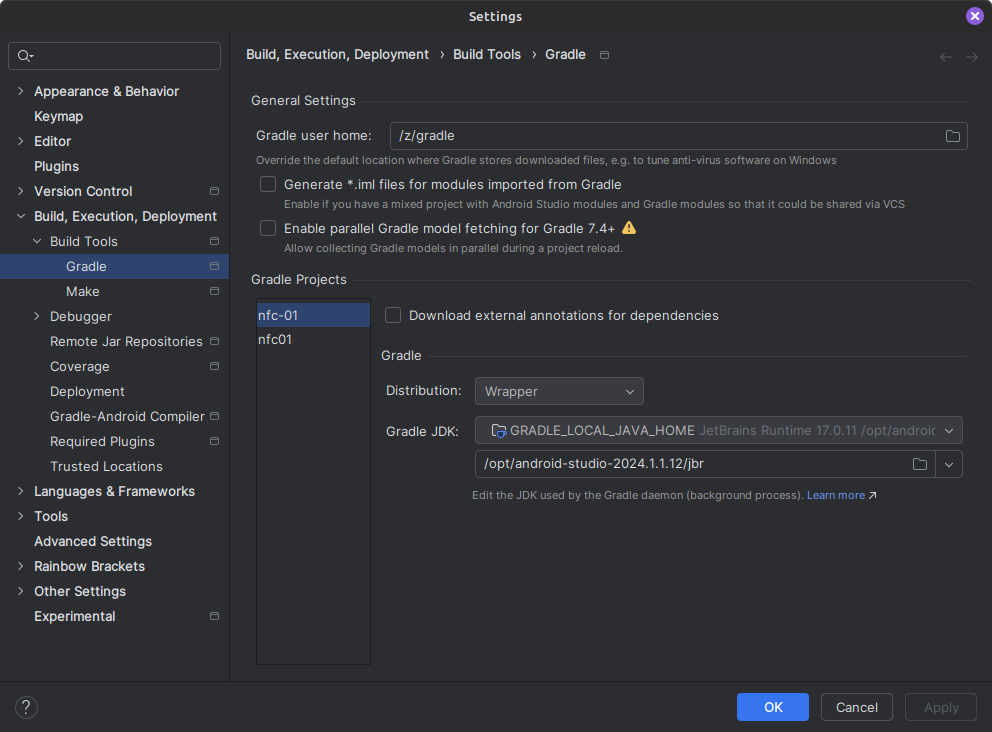
    こんな感じでリネーム前の nfc01 と言う gradle プロジェクトが同期に失敗します。おもむろにファイル全体を検索しみますが、nfc01 はみつかりませんでした。

    Android Studio をうろうろしていると全体の設定に変更する前の nfc01 がありました。

    で、この nfc01 はどこから来たのかというと

    .idea/gradle.xml にあるようです。

    <?xml version="1.0" encoding="UTF-8"?>
    <project version="4">
      <component name="GradleMigrationSettings" migrationVersion="1" />
      <component name="GradleSettings">
        <option name="linkedExternalProjectsSettings">
          <GradleProjectSettings>
            <option name="externalProjectPath" value="/media/mnishi/opt/ws-jvc/nfc01" />
            <option name="gradleJvm" value="#GRADLE_LOCAL_JAVA_HOME" />
            <option name="modules">
              <set>
                <option value="/media/mnishi/opt/ws-jvc/nfc01" />
                <option value="/media/mnishi/opt/ws-jvc/nfc01/app" />
              </set>
            </option>
            <option name="resolveExternalAnnotations" value="false" />
          </GradleProjectSettings>
          <GradleProjectSettings>
            <option name="externalProjectPath" value="$PROJECT_DIR$" />
            <option name="gradleJvm" value="#GRADLE_LOCAL_JAVA_HOME" />
            <option name="modules">
              <set>
                <option value="/media/mnishi/opt/ws-jvc/nfc-01" />
                <option value="/media/mnishi/opt/ws-jvc/nfc-01/app" />
              </set>
            </option>
            <option name="resolveExternalAnnotations" value="false" />
          </GradleProjectSettings>
        </option>
      </component>
    </project>

    古いプロジェクト名である 6-17 行目を削除するとエラーはなくなりました。

    こういうとこほんと良くないよ。些末なことですがこういうのでだんだん Android を嫌いになっていくのよ。

    Android Kotlin インターフェイスの実装方法 3 パターン

    さて引き続き Android プロジェクトをやっているわけですが、オブジェクトにリスナーを渡してコールバックを登録する処理があると思うのですが、そのコールバックがインターフェイスの場合の実装方法についての話です。

    ひとことで言えば、インターフェイスは実装がないのでそのままでは変数にできないのでどうしよう ? ってときの定形のパターンです。

    実装したクラスを作るパターン

    素直にクラスを実装して渡すとこんな感じに書けます。

    public interface ReadListener {
      fun onSuccess(message: String)
    }
    
    class MyReadListener: ReadListener {
      override fun onSuccess(message: String) {
        // do something
      }
    }
    
    val listener = MyReadListener()
    target.addReadListener(listener)

    クラス作るのはちょっと大げさなときはリスナーを登録する際に、定義する方法があるようだ。

    登録するときに実装してしまうパターン

    こっちのほうがよく見ると思う。そもそも変数いらなくねってパターン。

    target.addReadListener(object: ReadListener {
      override fun onSuccess(message: String) {
        // do something
      }
    })

    object でiインターフェイスの型を指定すると {} で定義ができるっていうふうに解釈しましたがあっているのか?ちょっと不安ではあるが現時点の知識ではここまでが自分の限界。

    変数に無名クラスで実装するパターン

    調べていくと、パターン1 を無名クラスにする方法もあるようで今回はリスナー後で使いまわしたかったのでこのパターンにした。

    val myListener = object: ReadListener {
      override fun onSuccess(message: String)
    }
    target.addREadListener(myListerner)
    

    このへんのパターンは武道の型のように何度もやって覚えるしかないっていうのが個人的な感想。

    Android ワイアレスデバッグのショートカット設定

    また、Android アプリの開発に戻ってきたがあまり好きになれないのは相変わらず。そんなことはさておき、wireless debug の設定画面が深すぎて面倒なのでショートカットを探した話。

    しょーもない小ネタではあるのだが、自分用のメモとして残す。

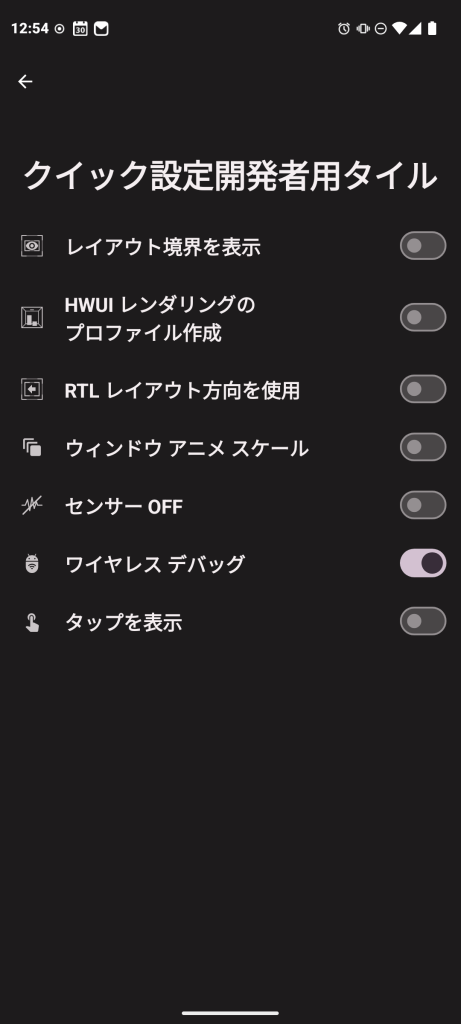
    開発者設定の [クイック設定開発者用タイル] で[ワイヤレスでバッグ] をオンにすると、ショートカットが設定できる。端末のメーカーによってはこの設定項目がないらしい。

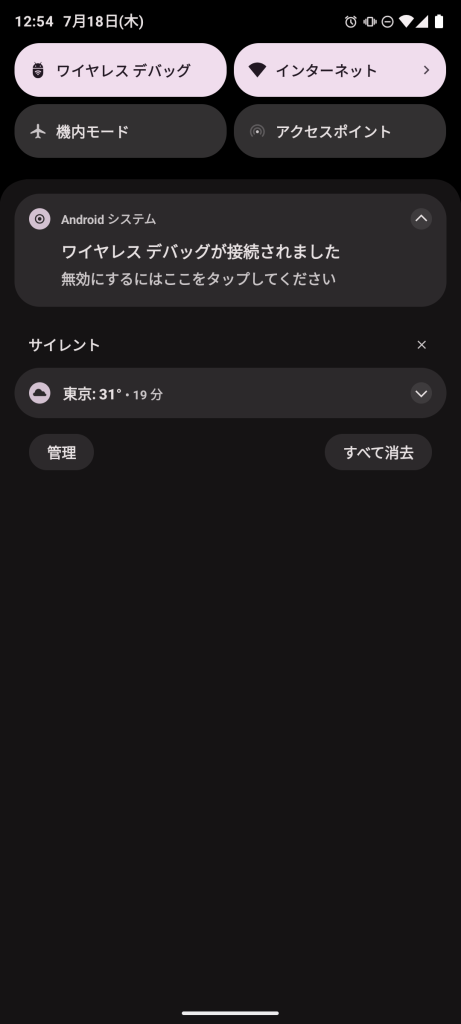
    設定をオンにするとどの画面でも上からスワイプで出てくる画面(これをクイックタイルと呼ぶ?)で切り替えられるようになる。