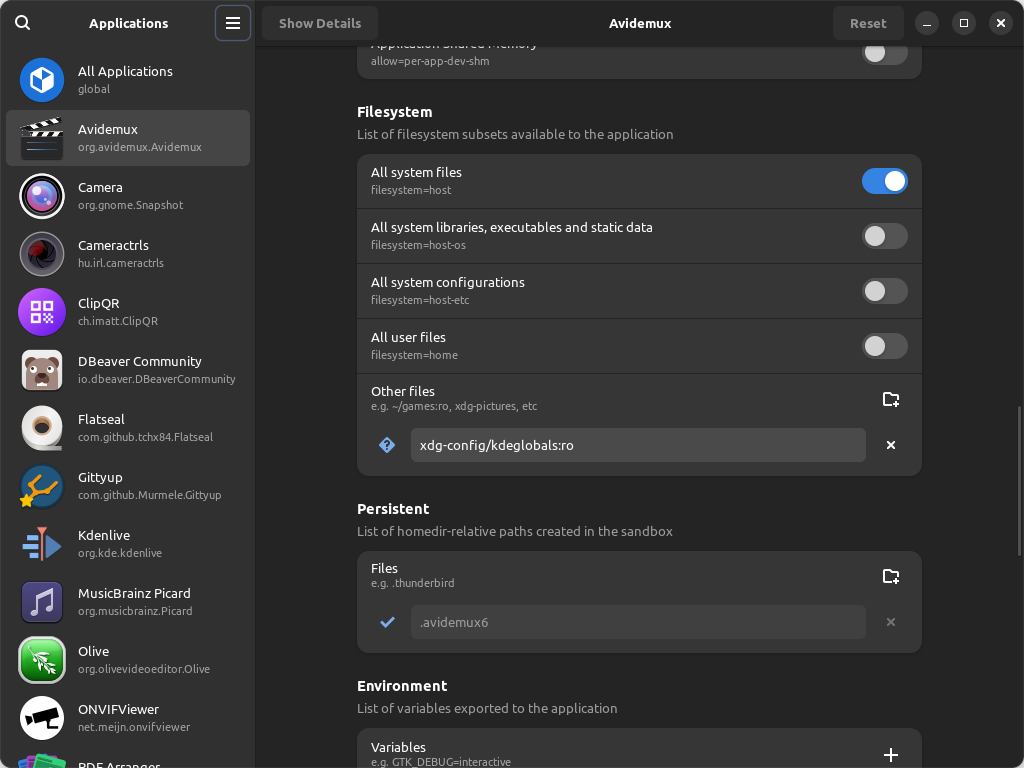
Flat パッケージでファイルアクセスできない時
すぐに忘れてしまうので、完全に自分用メモ。
flat パックも snap も基本的にはホスト PC を汚染しない発想なのでインストールしただけの状態ではファイルアクセスが制限されすぎている場合、調整する必要がある。
Flatseal というツールを使うとインストールした flat パッケージの一覧からファイルアクセス権を調整できる。

すぐに忘れてしまうので、完全に自分用メモ。
flat パックも snap も基本的にはホスト PC を汚染しない発想なのでインストールしただけの状態ではファイルアクセスが制限されすぎている場合、調整する必要がある。
Flatseal というツールを使うとインストールした flat パッケージの一覧からファイルアクセス権を調整できる。
3 部作の最後です、Messanger を使ってみます。
アクティビティとハンドラーの定義です。
package red.txn.service_messenger
import android.content.ComponentName
import android.content.Context
import android.content.Intent
import android.content.ServiceConnection
import android.os.Bundle
import android.os.Handler
import android.os.IBinder
import android.os.Looper
import android.os.Message
import android.os.Messenger
import android.util.Log
import androidx.activity.ComponentActivity
import androidx.activity.compose.setContent
import androidx.activity.enableEdgeToEdge
import androidx.compose.foundation.layout.fillMaxSize
import androidx.compose.foundation.layout.padding
import androidx.compose.material3.Scaffold
import androidx.compose.material3.Text
import androidx.compose.runtime.Composable
import androidx.compose.ui.Modifier
import androidx.compose.ui.tooling.preview.Preview
import red.txn.service_messenger.MainActivity.Companion.TAG
import red.txn.service_messenger.ui.theme.ServicemessengerTheme
class MainActivity : ComponentActivity() {
companion object {
const val TAG = "MainActivity"
}
override fun onCreate(savedInstanceState: Bundle?) {
super.onCreate(savedInstanceState)
enableEdgeToEdge()
setContent {
ServicemessengerTheme {
Scaffold(modifier = Modifier.fillMaxSize()) { innerPadding ->
Greeting(
name = "Android",
modifier = Modifier.padding(innerPadding)
)
}
}
}
// launch service
Intent(this, MessengerService::class.java).also { intent ->
bindService(intent, serviceConnection, Context.BIND_AUTO_CREATE)
}
}
private lateinit var messenger: Messenger
private val serviceConnection = object : ServiceConnection {
override fun onServiceConnected(name: ComponentName?, service: IBinder?) {
messenger = Messenger(service)
}
override fun onServiceDisconnected(name: ComponentName?) {
Log.d(TAG, "onServiceDisconnected()")
}
}
}
class MessageHandler: Handler(Looper.getMainLooper()) {
override fun handleMessage(msg: Message) {
when(msg.what) {
MESSAGE_FROM_SERVICE-> {
// handle the response message
Log.d(TAG, "received: ${msg.data.toString()}")
}
else -> {
Log.d(TAG, "received other: $msg")
}
}
}
}
//***
//*** compsable functions
//***
@Composable
fun Greeting(name: String, modifier: Modifier = Modifier) {
Text(
text = "Hello $name!",
modifier = modifier
)
}
@Preview(showBackground = true)
@Composable
fun GreetingPreview() {
ServicemessengerTheme {
Greeting("Android")
}
}
class Handler はサービスでも参照します。
package red.txn.service_messenger
import android.app.Service
import android.content.Intent
import android.os.Binder
import android.os.Handler
import android.os.IBinder
import android.os.Looper
import android.os.Message
import android.os.Messenger
import android.util.Log
import kotlinx.coroutines.CoroutineScope
import kotlinx.coroutines.Dispatchers
import kotlinx.coroutines.cancel
import kotlinx.coroutines.launch
const val MESSAGE_FROM_SERVICE: Int = 2
class MessengerService : Service() {
companion object {
const val TAG = "MessengerService"
}
private val messenger = Messenger(MessageHandler())
override fun onBind(intent: Intent): IBinder {
Log.d(TAG, "onBind()")
Thread {
for (i in 1..2) {
Thread.sleep(2000)
sendMessageFromService()
Log.d(TAG, "sendBroadcast: $i")
}
}.start()
return MyBinder()
}
inner class MyBinder: Binder() {
fun getService(): MessengerService = this@MessengerService
}
private fun sendMessageFromService() {
val message = Message.obtain()
message.what = MESSAGE_FROM_SERVICE
message.data.putString("message", "Hello from MessengerService")
//message.replyTo = messenger
messenger.send(message)
}
override fun onDestroy() {
super.onDestroy()
Log.d(TAG, "onDestroy(")
}
}
普通はメッセージの場合、普通は双方向通信に使うことが多いようですが、message.replyTo が空でも問題ないようです。
ちょっと試していないのでなんともいえませんがこのサービスももしかすると、startService() 起動に書き換えることができるかもしれません。その場合は Messenger を Activity に渡す必要があるので、LiveData の時と同じようにMessenger を companion object にする必要がありそうです。
その 2 今度は LiveData を使ってみます。
LiveData を使うならこんな感じ
package red.txn.service_livedata
import android.content.ComponentName
import android.content.Context
import android.content.Intent
import android.content.ServiceConnection
import android.os.Bundle
import android.os.IBinder
import android.util.Log
import androidx.activity.ComponentActivity
import androidx.activity.compose.setContent
import androidx.activity.enableEdgeToEdge
import androidx.compose.foundation.layout.fillMaxSize
import androidx.compose.foundation.layout.padding
import androidx.compose.material3.Scaffold
import androidx.compose.material3.Text
import androidx.compose.runtime.Composable
import androidx.compose.ui.Modifier
import androidx.compose.ui.tooling.preview.Preview
import red.txn.service_livedata.ui.theme.ServicelivedataTheme
class MainActivity : ComponentActivity() {
override fun onCreate(savedInstanceState: Bundle?) {
super.onCreate(savedInstanceState)
enableEdgeToEdge()
setContent {
ServicelivedataTheme {
Scaffold(modifier = Modifier.fillMaxSize()) { innerPadding ->
Greeting(
name = "Android",
modifier = Modifier.padding(innerPadding)
)
}
}
}
// launch service
Intent(this, LiveDataService::class.java).also { intent ->
bindService(intent, connection, Context.BIND_AUTO_CREATE)
}
}
private var bound = false
private lateinit var liveDataService: LiveDataService
private val connection = object : ServiceConnection {
override fun onServiceConnected(name: ComponentName?, service: IBinder) {
val binder = service as LiveDataService.MyBinder
liveDataService = binder.getService()
bound = true
observeData()
}
override fun onServiceDisconnected(name: ComponentName?) {
bound = false
}
}
fun observeData() {
liveDataService.BUS.observe(this) { newData ->
Log.d("AAA", "Activity:" + newData.toString())
}
}
}
//***
//*** Composable functions
//***
@Composable
fun Greeting(name: String, modifier: Modifier = Modifier) {
Text(
text = "Hello $name!",
modifier = modifier
)
}
@Preview(showBackground = true)
@Composable
fun GreetingPreview() {
ServicelivedataTheme {
Greeting("Android")
}
}
bindService() でサービス起動をしているので少し様子が異なるが、バインドしたとき observeData() で監視している。とっても簡単
package red.txn.service_livedata
import android.app.Service
import android.content.Intent
import android.os.Binder
import android.os.IBinder
import android.util.Log
import androidx.lifecycle.MutableLiveData
import kotlinx.coroutines.CoroutineScope
import kotlinx.coroutines.Dispatchers
import kotlinx.coroutines.launch
class LiveDataService : Service() {
companion object {
const val TAG = "LiveDataService"
}
val BUS = MutableLiveData<String>()
override fun onBind(intent: Intent): IBinder {
Log.d(TAG, "serviee onBind()")
Thread {
for (i in 1..2) {
Thread.sleep(2000)
updateData("データ$i")
Log.d(TAG, "データ$i")
}
}.start()
val scope = CoroutineScope(Dispatchers.IO)
scope.launch {
for (i in 1..2) {
Thread.sleep(2000)
updateData("データ2$i")
Log.d(TAG, "データ2$i")
}
}
return MyBinder()
}
inner class MyBinder: Binder() {
fun getService(): LiveDataService = this@LiveDataService
}
private fun updateData(newData: String) {
BUS.postValue(newData)
}
}
AndroidManifest.xml は生成されたものなので省略。
startService() でサービス起動したい場合は、こんなふうになった。
package red.txn.service_livedata
import android.content.ComponentName
import android.content.Context
import android.content.Intent
import android.content.ServiceConnection
import android.os.Bundle
import android.os.IBinder
import android.util.Log
import androidx.activity.ComponentActivity
import androidx.activity.compose.setContent
import androidx.activity.enableEdgeToEdge
import androidx.compose.foundation.layout.fillMaxSize
import androidx.compose.foundation.layout.padding
import androidx.compose.material3.Scaffold
import androidx.compose.material3.Text
import androidx.compose.runtime.Composable
import androidx.compose.ui.Modifier
import androidx.compose.ui.tooling.preview.Preview
import red.txn.service_livedata.ui.theme.ServicelivedataTheme
class MainActivity : ComponentActivity() {
override fun onCreate(savedInstanceState: Bundle?) {
super.onCreate(savedInstanceState)
enableEdgeToEdge()
setContent {
ServicelivedataTheme {
Scaffold(modifier = Modifier.fillMaxSize()) { innerPadding ->
Greeting(
name = "Android",
modifier = Modifier.padding(innerPadding)
)
}
}
}
// launch service
Intent(this, LiveDataService::class.java).also { intent ->
startService(intent)
}
LiveDataService.BUS.observe(this) {
Log.d("BUS change:", "Activity:" + it.toString())
}
}
}
//***
//*** Composable functions
//***
@Composable
fun Greeting(name: String, modifier: Modifier = Modifier) {
Text(
text = "Hello $name!",
modifier = modifier
)
}
@Preview(showBackground = true)
@Composable
fun GreetingPreview() {
ServicelivedataTheme {
Greeting("Android")
}
}
サービスの方では LiveData を companion object に入れてインスタンスなしでも取得できるようにしている。
package red.txn.service_livedata
import android.app.Service
import android.content.Intent
import android.os.Binder
import android.os.IBinder
import android.util.Log
import androidx.lifecycle.MutableLiveData
import kotlinx.coroutines.CoroutineScope
import kotlinx.coroutines.Dispatchers
import kotlinx.coroutines.launch
class LiveDataService : Service() {
companion object {
const val TAG = "LiveDataService"
val BUS = MutableLiveData<String>()
}
override fun onBind(intent: Intent): IBinder? {
return null
}
override fun onStartCommand(intent: Intent?, flags: Int, startId: Int): Int {
super.onStartCommand(intent, flags, startId)
Thread {
for (i in 1..2) {
Thread.sleep(2000)
BUS.postValue("newData: $i")
}
}
return START_STICKY
}
}
Gemini を使ってみているが、前の文脈からの続きの質問したら流れをぶった切って新しい話題のように回答するのやめてほしい。Claude のほうがその辺楽かも。
今回は3部作になり、その1です。
何をしたいかというとサービスで何か変更した状態をActivityに知らせる方法を試してみます。
Gemini に聞いてみると 3 つの方法があるようです。
まずは、SendBroadCast を使ってみます。
インテントをブロードキャストするパターンの場合、他のアプリでも受信できるようです。
アクティビティはこんな感じになります。
package red.txn.service_broadcast
import android.content.BroadcastReceiver
import android.content.Context
import android.content.Intent
import android.content.IntentFilter
import android.os.Bundle
import android.util.Log
import androidx.activity.ComponentActivity
import androidx.activity.compose.setContent
import androidx.activity.enableEdgeToEdge
import androidx.compose.foundation.layout.fillMaxSize
import androidx.compose.foundation.layout.padding
import androidx.compose.material3.Scaffold
import androidx.compose.material3.Text
import androidx.compose.runtime.Composable
import androidx.compose.ui.Modifier
import androidx.compose.ui.platform.LocalContext
import androidx.compose.ui.tooling.preview.Preview
import red.txn.service_broadcast.ui.theme.ServicebroadcastTheme
class MainActivity : ComponentActivity() {
private lateinit var receiver: MyReceiver
override fun onCreate(savedInstanceState: Bundle?) {
super.onCreate(savedInstanceState)
enableEdgeToEdge()
setContent {
ServicebroadcastTheme {
Scaffold(modifier = Modifier.fillMaxSize()) { innerPadding ->
Greeting(
name = "Android",
modifier = Modifier.padding(innerPadding)
)
}
}
}
val filter = IntentFilter("serviceComm")
receiver = MyReceiver()
registerReceiver(receiver, filter, RECEIVER_NOT_EXPORTED)
val serviceIntent = Intent(this, MyService::class.java)
startService(serviceIntent)
}
override fun onDestroy() {
super.onDestroy()
unregisterReceiver(receiver)
}
}
class MyReceiver: BroadcastReceiver() {
companion object {
val TAG = "MyReceiver"
}
override fun onReceive(context: Context?, intent: Intent) {
val action = intent.action
val extras = intent.extras
Log.d(TAG, "onReceive - action: $action")
extras?.let {
for (key in it.keySet()) {
val value = it.getString(key)
Log.d(TAG, "onReceive - extras: $value")
}
}
}
}
@Composable
fun Greeting(name: String, modifier: Modifier = Modifier) {
val context = LocalContext.current
Text(
text = "Hello $name!",
modifier = modifier
)
}
@Preview(showBackground = true)
@Composable
fun GreetingPreview() {
ServicebroadcastTheme {
Greeting("Android")
}
}
クラス MyReceiver は分けたほうがいいですけど、面倒なのでここに入れてます。 IntentFilter に直接文字列で “serviceComm” を入れていますが、これはちゃんと const にしたほうがいいと思います。この値はサービス側でも同じものを使い送信元を識別します。
サービスは、Android Studio のFile > New > Service > Service メニューから追加すると簡単でいいです。
AndroidManifest.xml に必要なエントリを追加してくれます。
package red.txn.service_broadcast
import android.app.Service
import android.content.Intent
import android.content.res.Configuration
import android.os.IBinder
import android.util.Log
class MyService : Service() {
companion object {
val TAG = "MyService"
}
override fun onBind(intent: Intent): IBinder? {
return null
}
override fun onStartCommand(intent: Intent?, flags: Int, startId: Int): Int {
Thread {
for (i in 1..2) {
Thread.sleep(3000)
val intent = Intent("serviceComm").putExtra("data", "メッセージ$i")
sendBroadcast(intent)
Log.d(TAG, "sendBroadcast: $i")
}
}.start()
return START_STICKY
}
override fun onDestroy() {
super.onDestroy()
Log.d(TAG, "onDestroy")
}
}
startService() でサービスを起動しているので onStartCommand() で受けます。一応サービスっぽく時間がかかる処理をするためにダミーで Thread {} で時間稼いでます。
実行すると class MyReceiver: BroadcastReceiver() で受信して、Log.d(TAG, “onReceive – extras: $value”) で内容を表示します。
最後に AndroidManifest.xml を提示しますが、Android Studio が自動生成したものでいじっていません。
<?xml version="1.0" encoding="utf-8"?>
<manifest xmlns:android="http://schemas.android.com/apk/res/android"
xmlns:tools="http://schemas.android.com/tools">
<application
android:allowBackup="true"
android:dataExtractionRules="@xml/data_extraction_rules"
android:fullBackupContent="@xml/backup_rules"
android:icon="@mipmap/ic_launcher"
android:label="@string/app_name"
android:roundIcon="@mipmap/ic_launcher_round"
android:supportsRtl="true"
android:theme="@style/Theme.Servicebroadcast"
tools:targetApi="31">
<service
android:name=".MyService"
android:enabled="true"
android:exported="true"></service>
<activity
android:name=".MainActivity"
android:exported="true"
android:label="@string/app_name"
android:theme="@style/Theme.Servicebroadcast">
<intent-filter>
<action android:name="android.intent.action.MAIN" />
<category android:name="android.intent.category.LAUNCHER" />
</intent-filter>
</activity>
</application>
</manifest>
Shanling の M3X という DAP を使用していますが、SD カードスロットの蓋に付いていた O (オー) リングが突然切れました。
O リングというのは、この場合黒いゴムのパッキンのことをいいます。防水目的でこのリングで水の侵入の防ぐ役割をしています。(ちょっと前のSDカードスロットありのスマホの蓋も同じようになってます。)
仕方ないので瞬間接着剤で切れた O リングをつけてしのいでいたのですがすぐにまた切れてしまい面倒とおもいつつ合いそうな O リングを買って修理してみました。
【楽天市場】線形 0.5mm 外径 1.5mm ~ 9mm 選択 NBR Oリング ニトリルゴム 耐油 耐摩耗:GAVAN
こちらの 線形0.5mm 幅 外径/内径 8mm/7mm です。
オリジナルのものと比較すると若干細いようです。(ちょっと失敗したかもしれません。)
フタの溝にそって着てみると若干細いのが災いしてスカスカですぐ開いてしまいます。仕方ないので2本掛けすると今度は、少しゆるいながらも止まったのでこれでよしとします。
様子見て3本がけか、同じお店で売っていた 0.7mm に変えるかもしません。
同じ現象で困っている人の役にたてれば嬉しいです。
超小ネタです。
ip a するとたくさんのアダプタとそれぞれのアドレスが一覧で表示されますが、このままだとスクリプトで再利用する際にはちょっと都合が悪いときのワンライナーです。
例えば wlan0 の IPv4アドレスを取り出したいときはこんなふうに書けます。
$ ip a dev wlan0 |grep inet | awk '{print $2}' | awk -F '/' '{print $1}'
分解すると ip a show dev wlan0| gerp inet ではこんな感じの値が取得できます。
inet 192.168.1.111/24 brd 192.168.1.255 scope global wlan0
1つ目の awk は2番めのトークンを切り出すので
192.168.1.111/24
を出力します。
2つ目の awk では / を区切り文字として 1 番めを取り出すので
192.168.1.111
が手に入ります。これをスクリプト変数なりにいれるとスクリプトで使いまわすことができます。
makefile で使うには $1 は $$1 にする必要がある。
もともと Android デバイスを WiFiデバッグ接続しようとして調べたのだが、そもそも Android デバイスの IP アドレスをネットワーク経由で知る方法がないので無駄だったかもしれない。(IP アドレスを知るために USB デバッグで接続する必要があるのでもうつながっている。)
とはいえ、ip コマンドからアドレスだけを取り出したいシーンは結構あるので覚えておこう
Android が avahi 対応してくれるといいのだけれど…。多分されないでしょうね。
今日も Android Studio と格闘してます。
ちょっとプロジェクト名の typo が気になり安易に refactor したらちょっとハマりました。以前もハマったのですが全く対処方法を覚えていなかったのでメモ
ツリービューから Refactor でリネームしたのがそもそもの原因ですが、Refactor 後から gradle のシンクにエラーが出ます。
こんな感じでリネーム前の nfc01 と言う gradle プロジェクトが同期に失敗します。おもむろにファイル全体を検索しみますが、nfc01 はみつかりませんでした。
Android Studio をうろうろしていると全体の設定に変更する前の nfc01 がありました。
で、この nfc01 はどこから来たのかというと
.idea/gradle.xml にあるようです。
<?xml version="1.0" encoding="UTF-8"?>
<project version="4">
<component name="GradleMigrationSettings" migrationVersion="1" />
<component name="GradleSettings">
<option name="linkedExternalProjectsSettings">
<GradleProjectSettings>
<option name="externalProjectPath" value="/media/mnishi/opt/ws-jvc/nfc01" />
<option name="gradleJvm" value="#GRADLE_LOCAL_JAVA_HOME" />
<option name="modules">
<set>
<option value="/media/mnishi/opt/ws-jvc/nfc01" />
<option value="/media/mnishi/opt/ws-jvc/nfc01/app" />
</set>
</option>
<option name="resolveExternalAnnotations" value="false" />
</GradleProjectSettings>
<GradleProjectSettings>
<option name="externalProjectPath" value="$PROJECT_DIR$" />
<option name="gradleJvm" value="#GRADLE_LOCAL_JAVA_HOME" />
<option name="modules">
<set>
<option value="/media/mnishi/opt/ws-jvc/nfc-01" />
<option value="/media/mnishi/opt/ws-jvc/nfc-01/app" />
</set>
</option>
<option name="resolveExternalAnnotations" value="false" />
</GradleProjectSettings>
</option>
</component>
</project>
古いプロジェクト名である 6-17 行目を削除するとエラーはなくなりました。
こういうとこほんと良くないよ。些末なことですがこういうのでだんだん Android を嫌いになっていくのよ。
さて引き続き Android プロジェクトをやっているわけですが、オブジェクトにリスナーを渡してコールバックを登録する処理があると思うのですが、そのコールバックがインターフェイスの場合の実装方法についての話です。
ひとことで言えば、インターフェイスは実装がないのでそのままでは変数にできないのでどうしよう ? ってときの定形のパターンです。
素直にクラスを実装して渡すとこんな感じに書けます。
public interface ReadListener {
fun onSuccess(message: String)
}
class MyReadListener: ReadListener {
override fun onSuccess(message: String) {
// do something
}
}
val listener = MyReadListener()
target.addReadListener(listener)
クラス作るのはちょっと大げさなときはリスナーを登録する際に、定義する方法があるようだ。
こっちのほうがよく見ると思う。そもそも変数いらなくねってパターン。
target.addReadListener(object: ReadListener {
override fun onSuccess(message: String) {
// do something
}
})
object でiインターフェイスの型を指定すると {} で定義ができるっていうふうに解釈しましたがあっているのか?ちょっと不安ではあるが現時点の知識ではここまでが自分の限界。
調べていくと、パターン1 を無名クラスにする方法もあるようで今回はリスナー後で使いまわしたかったのでこのパターンにした。
val myListener = object: ReadListener {
override fun onSuccess(message: String)
}
target.addREadListener(myListerner)
このへんのパターンは武道の型のように何度もやって覚えるしかないっていうのが個人的な感想。
このブログのコードブロックでは “Highlighting Code Block” というプラグインを使っています。
がデフォルトで対応する言語はあまり多くありません。公式の説明では追加方法がわかりにくかったので調べてみまみました。
「ひいらぎナレッジ倉庫」さんのサイトによると新しく対応したい言語を追加したバージョンの Prism.js /Prism.css を追加する必要がありそうです。
今回は、XML と Kotlin を追加します。
同じく [HCB] 設定の [使用する言語セット] に以下の行を追加します。もともとの末尾に , がない場合はエラーになるので末尾に追加します。(PHP のハッシュや配列の場合、最後の要素に , が付いていてもエラーにならないので最初からつけておいたほうが簡単です。)
Kotlin: “Kotlin”,
xml: “XML”
これで、 Kotlin と XML を選択してハイライトできるようになった。
今回は珍しく長いです。
先日から Android のタスクにまた取り組んでいます。リハビリをかねて Jetpack compose を勉強しています。
自分の理解では、@composable な関数は外から状態を変更できないので、何らかの方法で外部に状態を維持しなければなりません。
そうなると MVVM って話になるようなのですが、Model と ViewModel の連携についてはあまりいいサンプルが見つけられなかった。ネットに転がっているサンプルでは UI 操作で ViewModel の変更が完結しているものがほとんどです。このパターンでは Model が View をまたぐ場合のことは触れていないので自分で考えなければいけません。r
結局のところ、モデルをビュー(Activity) の外に置くのが一番簡単な解決策じゃないかと思います。
参考リンクが唯一、Model から ViewModel に更新を通知する例を見つけられたのでそれをそのまま写経してみた。
まずは、compose を使って ViewModel の LiveData を UI に通知するパターンをつくる。 ついでに ViewModel を Model の一部とみなして Activity の外で宣言する例。ViewModel は別ファイルに分けるべきですが面倒なのでそのままです。
package xxx.yyy.logpanecompose
import android.os.Bundle
import androidx.activity.ComponentActivity
import androidx.activity.compose.setContent
import androidx.activity.enableEdgeToEdge
import androidx.compose.foundation.layout.Column
import androidx.compose.foundation.layout.fillMaxSize
import androidx.compose.foundation.layout.padding
import androidx.compose.material3.Button
import androidx.compose.material3.Scaffold
import androidx.compose.material3.Text
import androidx.compose.material3.TextField
import androidx.compose.runtime.Composable
import androidx.compose.runtime.getValue
import androidx.compose.runtime.livedata.observeAsState
import androidx.compose.ui.Modifier
import androidx.compose.ui.tooling.preview.Preview
import androidx.compose.ui.unit.dp
import androidx.lifecycle.MutableLiveData
import androidx.lifecycle.ViewModel
import androidx.lifecycle.viewmodel.compose.viewModel
import red.txn.logpanecompose.ui.theme.LogPaneComposeTheme
class MainActivity : ComponentActivity() {
val vm = MyApp.getInstance().getViewModel()
override fun onCreate(savedInstanceState: Bundle?) {
super.onCreate(savedInstanceState)
enableEdgeToEdge()
// val vm = LogViewModel()
setContent {
LogPaneComposeTheme {
Scaffold(modifier = Modifier.fillMaxSize()) { innerPadding ->
LogPane(vm=vm, modifier = Modifier.padding(innerPadding))
// LogPane(modifier=Modifier.padding(innerPadding))
}
}
}
}
}
class LogViewModel(): ViewModel() {
val buffer = MutableLiveData("")
private var count: Int = 0
fun append(newLine: String) {
buffer.value = buffer.value + newLine + count.toString() + "\n"
count++
}
}
@Composable
fun LogPane(
modifier: Modifier=Modifier,
vm: LogViewModel = viewModel()
) {
val text: String by vm.buffer.observeAsState("")
Column(modifier=modifier.padding(horizontal=16.dp)) {
Button(
onClick={vm.append("aZZZ")},
modifier=modifier.padding(top=0.dp, bottom=4.dp )
)
{
Text(text="add log")
}
TextField(
value=text,
onValueChange = { },
singleLine = false,
modifier = modifier.fillMaxSize()
)
}
}
@Preview(showBackground = true)
@Composable
fun LogPanePreview() {
LogPaneComposeTheme {
LogPane()
}
}
MainActivity の先頭でアプリケーションクラスから ViewModel を持ってきています。
独自のアプリケーションクラスを書きます
package xxx.yyy.logpanecompose
import android.app.Application
class MyApp: Application() {
public val vm = LogViewModel() // private にするべきかも
companion object {
private var instance: MyApp? = null
fun getInstance(): MyApp {
if (instance == null) {
instance = MyApp()
}
return instance!!
}
}
public fun getViewModel() = vm
}
MyApp を使うように AndroidManifest.xml を変更します。
<?xml version="1.0" encoding="utf-8"?>
<manifest xmlns:android="http://schemas.android.com/apk/res/android"
xmlns:tools="http://schemas.android.com/tools">
<application
android:name=".MyApp"
android:allowBackup="true"
android:dataExtractionRules="@xml/data_extraction_rules"
android:fullBackupContent="@xml/backup_rules"
android:icon="@mipmap/ic_launcher"
android:label="@string/app_name"
android:roundIcon="@mipmap/ic_launcher_round"
android:supportsRtl="true"
android:theme="@style/Theme.LogPaneCompose"
tools:targetApi="31">
<activity
android:name=".MainActivity"
android:exported="true"
android:label="@string/app_name"
android:theme="@style/Theme.LogPaneCompose">
<intent-filter>
<action android:name="android.intent.action.MAIN" />
<category android:name="android.intent.category.LAUNCHER" />
</intent-filter>
</activity>
</application>
</manifest>
Model に LiveData を追加して ViewModel で監視するには下のように Model を追加し、 ViewModel を変更する。
// 省略
data class LogModel(val message: String) {
val buffer = MutableLiveData(message)
fun append(newMessage: String) {
buffer.value += newMessage + "\n"
}
}
class LogViewModel(val model: LogModel): ViewModel() {
var buffer = MutableLiveData("")
private val lifecycleOwner = CustomLifecycleOwner()
init {
lifecycleOwner.start()
model.buffer.observe(lifecycleOwner) {
println("viewmodel: $it")
buffer.value = it
}
}
fun append(newMessage: String) {
model.append(newMessage)
}
inner class CustomLifecycleOwner: LifecycleOwner {
private val registry = LifecycleRegistry(this)
override val lifecycle: Lifecycle
get() = registry
fun start() {
registry.currentState = Lifecycle.State.STARTED
}
@Suppress("unused")
fun stop() {
registry.currentState = Lifecycle.State.CREATED
}
}
}
MyApp もモデルを宣言するように変更する
package xxx.yyy.logpanecompose
import android.app.Application
class MyApp: Application() {
val model = LogModel("")
val vm = LogViewModel(model=model)
companion object {
private var instance: MyApp? = null
fun getInstance(): MyApp {
if (instance == null) {
instance = MyApp()
}
return instance!!
}
}
fun getViewModel() = vm
}
Model、ViewModel 層で LiveData を使うのはあまりよくないらしいとのことで、StateFlow パターンもやってみる。
// いろいろ省略
data class LogModel(val message: String) {
// val buffer = MutableLiveData(message)
val buffer = MutableStateFlow(message)
fun append(newMessage: String) {
buffer.value += newMessage + "\n"
}
}
class LogViewModel(val model: LogModel): ViewModel() {
var buffer = MutableLiveData("")
init {
viewModelScope.launch(Dispatchers.IO) {
model.buffer.collect {
println("viewmodel: $it")
buffer.postValue(it)
}
}
}
fun append(newMessage: String) {
model.append(newMessage)
}
}
僕たちはどのようにしてViewModelに通知すべきなのか #Android - Qiita